You can use the timeline and keyframe based editor in the 时间线 view to animate the properties of UI components. Animating properties enables their values to move through intermediate values instead of immediately changing to the target value. For example, to move an item in a scene, you can animate the properties that control the item's position, x and y, so that the item's position changes at keyframes on the way to the target position. Similarly, you could change the color and scale properties of the item at keyframes to make it appear to move closer or farther away.
Qt Quick allows you to declare various UI states in State objects. These states are comprised of property changes from a base state, and can be a useful way of organizing your UI logic. Transitions are objects you can associate with an item to define how its properties will animate when they change due to a state change.
Each component in a scene or a project can have its own timeline and its own set of states. We recommend that you place your timelines inside the components and precompose them. Each component's timeline runs independently of the rest of the scene, allowing for time-independent animations. Additionally, separate states allow common functionality to be factored out and reused across the scene. Do note, however, that adding states and timelines to your components will increase the file size and runtime memory requirements of your UI.
You can find a video tutorial about creating timelines and adding keyframes here .
To be able to create timelines, you also need the Qt Quick Timeline add-on module, which you can install with Qt 5.14, and later. For more information about adding the module to an older Qt version, see Adding Qt Quick Timeline Module to Qt Installations .
You specify settings for the timeline and for running the animation in the Timeline Settings 对话框。

To create a timeline to animate a UI component:
 (
Add Timeline (A)
) button, or press
A
to specify settings for the timeline and running the animation in the
Timeline Settings
对话框。
(
Add Timeline (A)
) button, or press
A
to specify settings for the timeline and running the animation in the
Timeline Settings
对话框。
To create additional timelines, select the
(
Add Timeline
) button next to the
timeline
tab.
To specify settings for running the timeline animations, select the
(
Add Animation
) button next to the
Animation Settings
group. For example, you could create settings for running a part of the timeline animation between specified frames or for running the animation backwards from the last frame to the first.
To modify the settings, select the
 (
Timeline Settings (S)
) button on the toolbar (or press
S
) in the
时间线
view.
(
Timeline Settings (S)
) button on the toolbar (or press
S
) in the
时间线
view.
The table at the bottom of the Timeline Settings dialog lists the available states. Double-click the values in the 时间线 and Animation column to bind the states to animations. In the Fixed Frame column, you can bind the states that don't have animations to fixed frames.
To animate components in the 时间线 view, move to a frame on the timeline and specify changes in the values of a property. Qt Creator automatically adds keyframes between two keyframes, and sets their values evenly to create an appearance of movement or transformation.
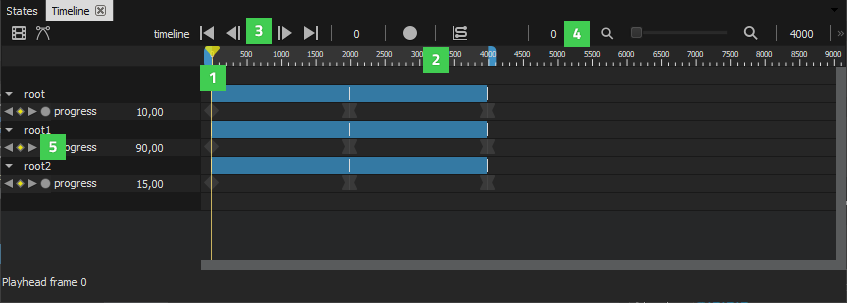
You can navigate the timeline in the following ways:
You can insert keyframes for all the properties of all the components that you want to animate first, and then record the changes in their values by selecting the
 (
Per Property Recording
) button for one property at a time. For example, you can hide and show items by turning their visibility off and on or by setting their opacity to 0 or 1.
(
Per Property Recording
) button for one property at a time. For example, you can hide and show items by turning their visibility off and on or by setting their opacity to 0 or 1.
You can also select the Auto Key (K) button (or press K ) to record changes in property values, but you need to be more careful about which property values you are changing to avoid surprises.
To record the changes of property values:
To remove all the changes you recorded for a property, right-click the property name on the timeline and select Remove Property .
Keyframes are marked on the timeline by using markers of different colors and shapes, depending on whether they are active or inactive or whether you have applied easing curves to them, for example.
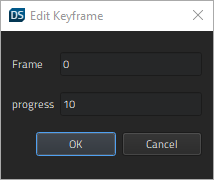
To edit the value of a keyframe, double-click a keyframe marker or select Edit Keyframe in the context menu. In the Frame field, you can set the frame and the value:
You can copy the keyframes from the keyframe track for an item and paste them to the keyframe track of another item. To copy all keyframes from one item to another one, select an item, and then select Copy All Keyframes in the context menu. Then select the other item and select Paste Keyframes 在上下文菜单。
To delete the selected keyframe, select Delete Keyframe 在上下文菜单。
To delete all keyframes from the selected item, select Delete All Keyframes 在上下文菜单。
To add keyframes to the keyframe track of an item at the current position of the playhead select Add Keyframes at Current Frame .
You can view the animation on the canvas by moving the playhead along the timeline.
To preview the animation, select the
Play (Space)
button or press
Space
. To preview the whole UI, select the
 (
Show Live Preview
) button on the canvas toolbar or press
Alt+P
.
(
Show Live Preview
) button on the canvas toolbar or press
Alt+P
.
Easing specifies the rate of a property value over time, so that components can appear to pick up speed, slow down, or bounce back at the end of the animation. By default, the animations you specify on the timeline are linear , which means that they move from the beginning to the end at a constant speed. You can use the Easing Curve Editor to edit the easing curve between two keyframes. You can also use the more advanced Curve Editor to edit the curves for the whole animation.
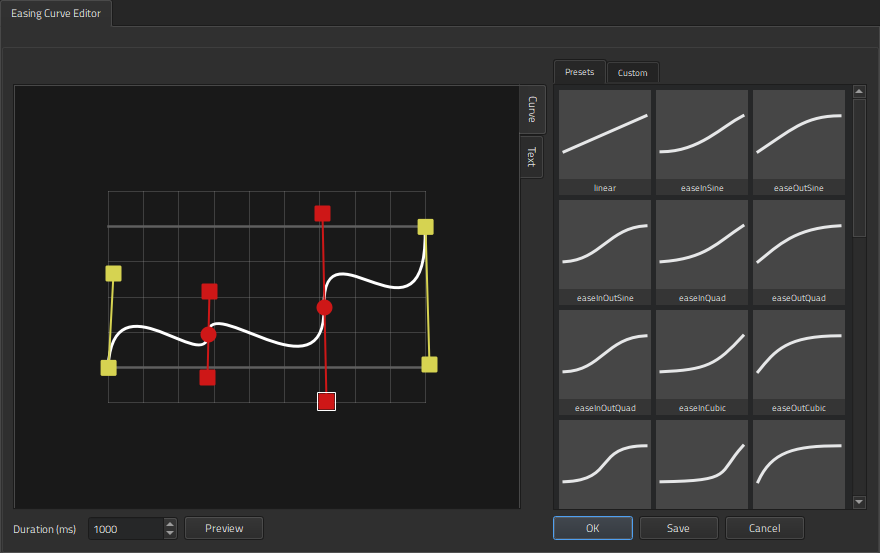
You can use the preset curves or modify them by dragging the curve handlers around. You can add points to the curve and drag them and the point handlers to modify the curve. When you are happy with the curve, you can save it as a custom curve. For more information about easing curve types, see the documentation for easing curves .
To zoom into and out of the easing curve editor, use the mouse roller. To reset the zoom factor, right-click in the picker and select Reset Zoom .
To attach easing curves to keyframes:
When you attach easing curves to keyframes, the shape of the keyframe marker changes from
 to
to
 .
.
To customize easing curves:
To paste easing curve definitions to Easing Curve Editor as text, select the Text tab.
在 Curve Editor , you can view and modify the whole animation curve. You can insert keyframes to the curve and drag them and the point handlers to modify the curve. You can modify the appearance of the curve in the style editor.
You can also edit easing curves that you added in
Easing Curve Editor
. If the item that contains the easing curves has been locked in
Navigator
, you can select
 to unlock it. You can also lock individual easing curves for editing.
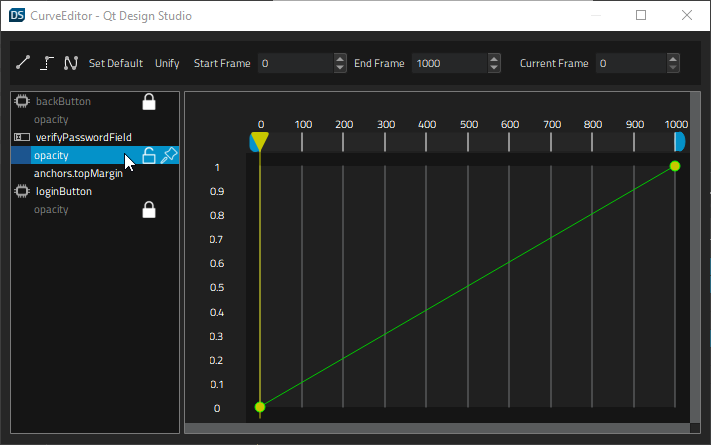
To edit animation curves:
Your changes are automatically saved when you close the view.
To animate components that rotate around a central point, you can use the Item QML type as a parent for the rotating component. Then create a timeline for the Item and set the rotation property for the start and end keyframes.