You can connect Android devices to the development PC using USB cables to build, run, debug, and analyze applications from Qt Creator. Devices with Android version 4.1 (API level 16) or later are supported.
To develop for Android, you must have a tool chain for building applications for Android devices installed on the development PC. Qt Creator can automatically dowload and install the tool chain and create a suitable build and run kit that contains the tool chain and the Qt version for Android for the device's architecture.
Starting from Qt 5.14.0, the Qt for Android package contains all the architectures (ABIs) installed as one.
注意: You can build a 64-bit version of Qt for Android yourself. However, for such a Qt version, the minimum required Android version on devices is 5.0 (API level 21). For more information, see Qt for Android .
The Android Debug Bridge (adb) command line tool is integrated to Qt Creator to enable you to deploy applications to connected Android devices, to run them, and to read their logs. It includes a client and server that run on the development host and a daemon that runs on the emulator or device.
To use Qt Creator to develop Qt applications for Android, you need Qt for Android 5.2, or later, and the tool chain that Qt Creator can automatically download, install, and configure for you. For more information, see Installing the Prerequisites .
Qt Creator offers to automatically install all the necessary packages and tools and to set up your development environment by creating debuggers, tool chains, and kits. You can use Qt Creator to:
To set up the development environment for Android:
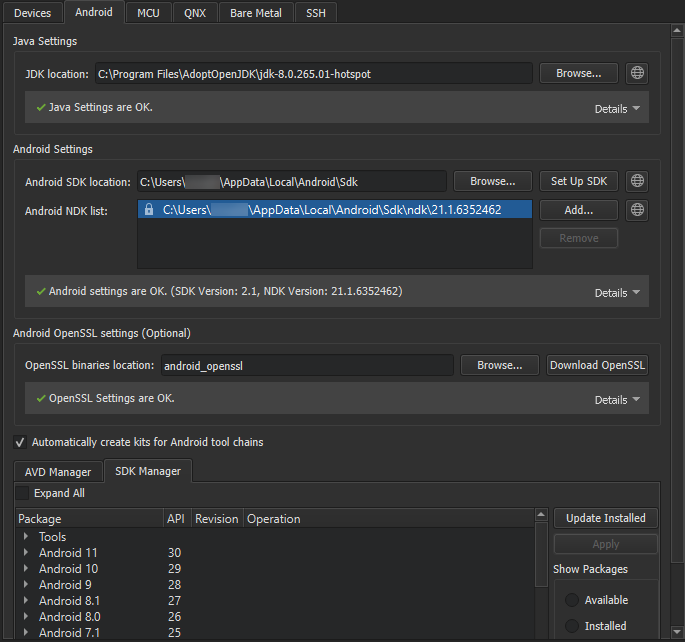
By default, Qt Creator tries to find a supported
AdoptOpenJDK
or
OpenJDK
installation. If none is found, you must set the path manually. If you don't have a supported JDK installed, select
 to open the JDK download web page in the default browser.
注意:
We recommended using a 64-bit JDK, because the 32-bit one might cause issues with
cmdline-tools
, and some packages might not be listed.
The SDK Manager checks whether the tool chain is installed. If packages are missing or updates are needed, the SDK Manager offers to add or remove those packages. Before taking action, it prompts you to accept the changes it is about to make. In addition, it prompts you to accept Google licenses, as necessary.
For Qt applications that require OpenSSL support, Qt Creator allows to quickly add the Android OpenSSL support to your project. For more information, see Adding External Libraries .
to download the OpenSSL repository to the selected path. If the automatic download fails, the download web page opens for manual download.
注意: We recommend that you use the latest Android SDK Command-Line Tools. Using Android SDK Tools version 25.2.5 or earlier is not supported, because they cannot be fully integrated with Qt Creator.
However, if the automatic setup does not meet your needs, you can download and install Android SDK Command-line Tools, and then install or update the NDKs, tools and packages needed for development. For more information, see Getting Started with Qt for Android .
The Android SDK Command-Line Tools download URL, the essential packages list, and the appropriate NDK for each Qt version are defined in a JSON configuration file. The file is located under the user's Qt Creator resource folder:
# Linux and macOS
~/.config/QtProject/qtcreator/android/sdk_definitions.json
# Windows
C:\Users\Username\AppData\Local\QtProject\qtcreator\android\sdk_definitions.json
For example, the SDK configuration file defines the NDK version 19.2.5345600 to be used for Qt 5.12.0 to 5.12.5 and Qt 5.13.0 to 5.13.1 versions:
"specific_qt_versions": [
    {
        "versions": ["5.12.[0-5]", "5.13.[0-1]"],
        "sdk_essential_packages": ["build-tools;28.0.2", "ndk;19.2.5345600"],
        "ndk_path": "ndk/19.2.5345600"
    }
]
You can view the latest version of the configuration file that is up-to-date with the Android SDK and NDK changes, sdk_definitions.json , in Git.
To view the installed Android NDK versions, select 工具 > Options > Devices > Android .
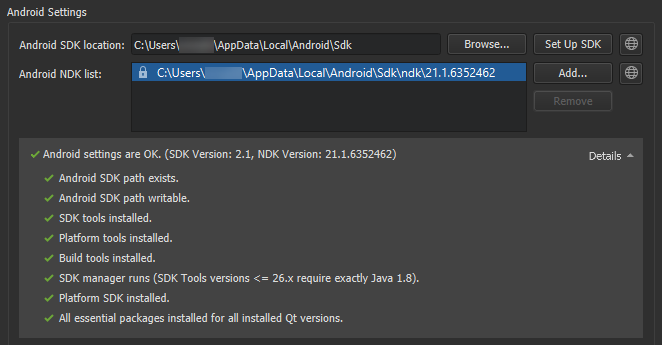
The locked versions were installed by the SDK Manager, and can only be modified from the SDK Manager tab. For more information, see Managing Android SDK Packages .
To manually download NDKs, select
.
To add custom NDK paths manually to the global list of NDKs, select Add . This creates custom tool chains and debuggers associated to that NDK. However, you have to manually create a kit that uses the custom NDK. For more information, see Adding Kits .
Since Android SDK Tools version 25.3.0, only a command-line tool, sdkmanager , is provided by Android for SDK package management. To make SDK management easier, Qt Creator provides an SDK Manager for installing, updating, and removing SDK packages. You can still use sdkmanager for advanced SDK management.
To view the installed Android SDK packages, select 工具 > Options > Devices > Android > SDK Manager .
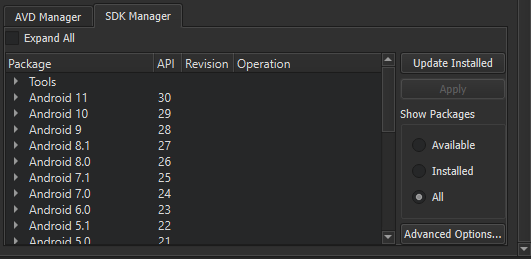
To filter the packages, select Available , Installed ,或 所有 in Show Packages .
To update the installed Android SDK packages, select Update Installed . Select the packages to update, and then select Apply .
To specify advanced sdkmanager settings, select 高级选项 and enter arguments in the SDK Manager arguments field. The available arguments are listed and described in Available arguments .
A list of AVDs is shown under 工具 > Options > Devices > Android > AVD Manager . This works only if the Android SDK location is set correctly in Android Settings .
The value in System/data partition size is used to set the emulator's system partition size upon execution with Start .
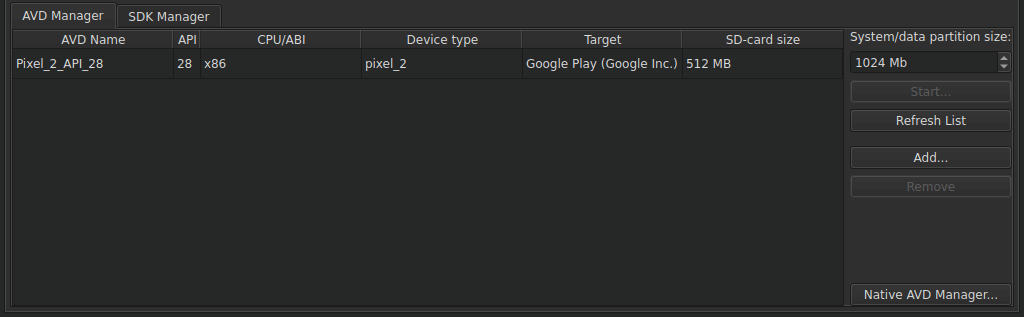
To create new virtual devices:
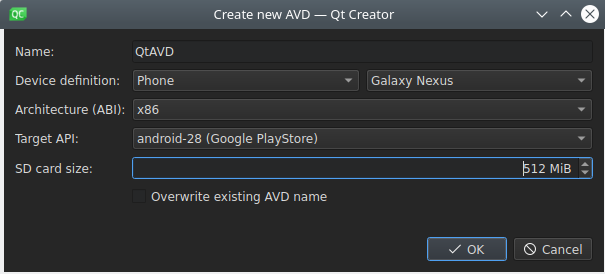
For more advanced options for creating a new AVD, use the command-line tool avdmanager , or use Android Studio's native AVD Manager's UI.
When you deploy an application to an Android device with Android version 4.2 (API 16) or later, the Select Android Device dialog opens. It lists the devices that are connected to the development PC, as well as AVDs, and their status. You can select devices or AVDs from the Compatible Devices list for deployment.
If Qt Creator determines that a device is not ready for deployment, it places the device in the Incompatible Devices list, with information about the issue. For example, you might need to authorize the connection on the device. After you authorize the connection on the device, select Refresh Device List . The device is moved to the Compatible Devices list and you can select it for deployment.
Other reasons for showing a device in Incompatible Devices are that the Android version on the device is too old or that the tool chain used for building does not match the Android architecture on the device (for example, you cannot deploy an ARM build on an x86 device).
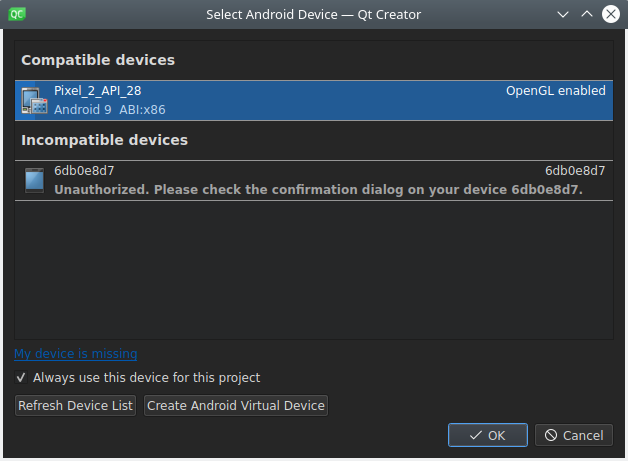
To create a new AVD , select Create Android Virtual Device .
To set a device as the default device for a particular Android architecture for the current project, select the Always use this device for architecture check box. The Select Android Devices dialog will not appear until you switch to another project or restart Qt Creator.
To run your application on the Android Emulator, you must have an Android virtual device (AVD). For more information about creating a new one, see Creating a New AVD . If you run an application without a device connected to the development PC and without an AVD specified, Qt Creator asks you to add an AVD.
注意: The Android Emulator has a bug that prevents it from starting on some systems. If the Android Emulator does not start, you can try starting it manually by running the following commands:
cd <ANDROID_SDK>/emulator
./emulator -avd <AVD_NAME>
更多信息,见 Start the emulator from the command line .
Debugging is enabled in different ways on different Android devices. Look for USB Debugging under Developer Options . On some devices Developer Options is hidden and becomes visible only when you tap the Build number field in 设置 > 关于 several times. For more information, see Configure on-device developer options .
Select a debug build configuration to build the application for debugging.
注意: Qt Creator cannot debug applications on Android devices if Android Studio is running. If the following message is displayed in the Output pane, close Android Studio and try again:
Ignoring second debugger -accepting and dropping.