This tutorial describes developing Qt Quick applications for Android and iOS devices using Qt Quick Controls. We use Qt Creator to implement a Qt Quick application that accelerates an SVG (Scalable Vector Graphics) image based on the changing accelerometer values.
For more information about the UI choices you have, see 用户界面 .
To be able to build the application for and run it on a mobile device, you must set up the development environment for the device platform and configure a connection between Qt Creator and the mobile device.
To develop for Android devices, you must install Qt for Android and set up the development environment, as instructed in 连接 Android 设备 .
To develop for iOS devices, you must install Xcode and use it to configure a device. For this, you need an Apple developer account and iOS Developer Program certificate that you receive from Apple. For more information, see 连接 iOS 设备 .
注意: Kits are listed if they have been specified in 工具 > Options > Kits (on Windows and Linux) or in Qt Creator > Preferences > Kits (on macOS). For more information, see Adding Kits .
For more information about the settings that you skipped, see Creating Qt Quick Applications .
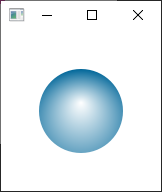
The main view of the application displays an SVG bubble image that moves around the screen when you tilt the device.
使用 Bluebubble.svg in this tutorial, but you can use any other image or a QML type, instead.
To create the UI in the Design mode:
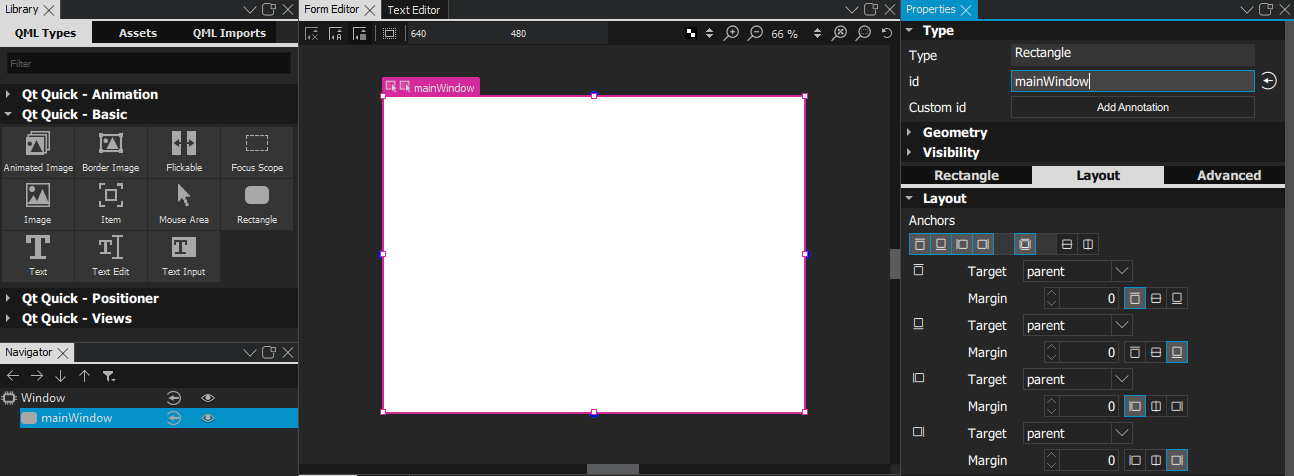
 (
Fill to Parent
) button to anchor the rectangle to the item.
(
Fill to Parent
) button to anchor the rectangle to the item.
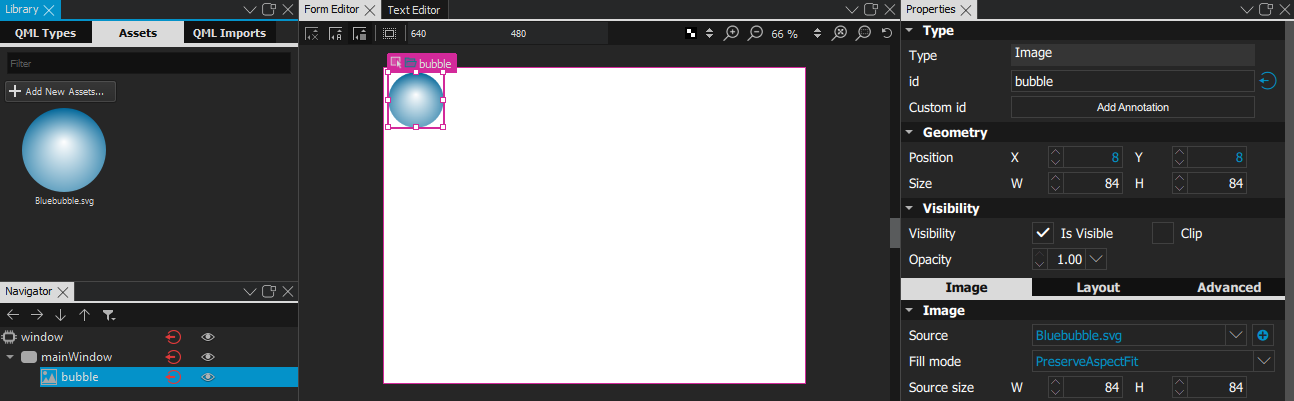
 (
Export
) button in
Navigator
to export
mainWindow
and
bubble
as properties.
(
Export
) button in
Navigator
to export
mainWindow
and
bubble
as properties.
We want to modify the properties of the bubble in ways that are not supported in the Design mode, and therefore we create a custom QML type for it:

Qt Creator creates a reference to the Bubble type in main.qml .
To check your code, you can compare your main.qml and Bubble.qml with the corresponding example files.
The UI is now ready and you can add the necessary properties for making the bubble move.
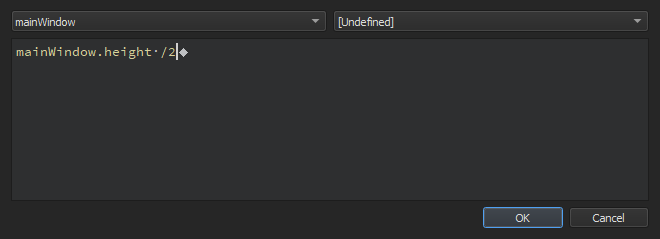
We add custom properties to position the image in respect to the width and height of the main window.
 button to add a custom property for the Bubble type.
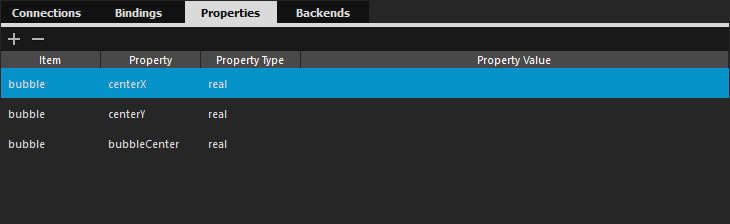
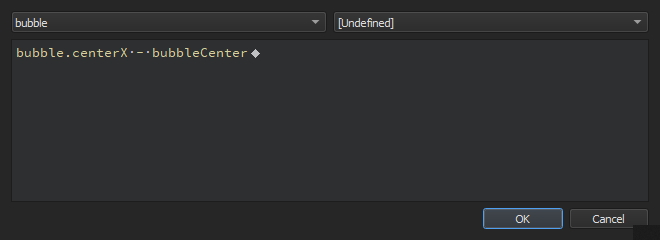
bubble.centerX - bubbleCenter
.
bubble.centerY - bubbleCenter
.
mainWindow.height /2
.
mainWindow.width /2
.
bubble.width /2
.
We now want to add code to move the bubble based on Accelerometer sensor values. This is not supported by Form Editor , so we will do it in 文本编辑器 :
import QtSensors 5.12
    Accelerometer {
       id: accel
       dataRate: 100
       active: true
       readonly property double radians_to_degrees: 180 / Math.PI
       }
    function calcPitch(x,y,z) {
        return -Math.atan2(y, Math.hypot(x, z)) * accel.radians_to_degrees;
    }
    function calcRoll(x,y,z) {
        return -Math.atan2(x, Math.hypot(y, z)) * accel.radians_to_degrees;
    }
onReadingChanged
signal of Accelerometer type to make the bubble move when the Accelerometer values change:
       onReadingChanged: {
var newX = (

bubble

.

x


+


calcRoll

(

accel

.

reading

.

x

,

accel

.

reading

.

y

,

accel

.

reading

.

z

)

*


0.1

)
var newY = (

bubble

.

y


-


calcPitch

(

accel

.

reading

.

x

,

accel

.

reading

.

y

,

accel

.

reading

.

z

)

*


0.1

)

if

 (

isNaN

(

newX

)

||


isNaN

(

newY

))

return

;

if

 (

newX


<


0

)

newX


=


0


if

 (

newX


>


mainWindow

.

width


-


bubble

.

width

)

newX


=


mainWindow

.

width


-


bubble

.

width


if

 (

newY


<


18

)

newY


=


18


if

 (

newY


>


mainWindow

.

height


-


bubble

.

height

)

newY


=


mainWindow

.

height


-


bubble

.

height


bubble

.

x


=


newX


bubble

.

y


=


newY

}
We want to ensure that the position of the bubble is always within the bounds of the screen. If the Accelerometer returns not a number (NaN), the value is ignored and the bubble position is not updated.
x
and
y
properties of the bubble to make its movement look smoother.
            Behavior on y {


SmoothedAnimation


{

easing

.type:

Easing

.

Linear


duration

:

100

}
}
Behavior on

x

{


SmoothedAnimation


{

easing

.type:

Easing

.

Linear


duration

:

100

}
}
The device display is rotated by default when the device orientation changes between portrait and landscape. For this example, it would be better for the screen orientation to be fixed.
To lock the orientation to portrait or landscape on Android, specify it in an AndroidManifest.xml that you can generate in Qt Creator. For more information, see Editing Manifest Files .
On iOS, you can lock the device orientation in a Info.plist file that you specify in the .pro file as the value of the QMAKE_INFO_PLIST 变量。
Update the accelbubble.pro file with the following library dependency information:
QT += quick sensors svg xml
On iOS, you must link to the above libraries statically, by adding the plugin names explicitly as values of the QTPLUGIN variable. Specify a qmake scope for iOS builds (which can also contain the QMAKE_INFO_PLIST variable):
ios {
QTPLUGIN += qsvg qsvgicon qtsensors_ios
QMAKE_INFO_PLIST = Info.plist
}
After adding the dependencies, select 构建 > Run qmake to apply the changes to the Makefile of the project.
The application is complete and ready to be deployed to a device:
If you are using a device running Android v4.2.2, it should prompt you to verify the connection to allow USB debugging from the PC it is connected to. To avoid such prompts every time you connect the device, select the Always allow from the computer check box, and then select OK .
文件: